I'm linking up today with
Marcia,
Patty, and
Erika for Tuesday's on the Run. This week's topic is Favorite Winter Gear. Winter's aren't really bad here in Vegas, so my winter gear isn't much more than long-sleeved shirts and running pants.
Instead, since I've received quite a few comments lately about Charity Miles (what it is, how it works, etc.), I thought I'd share a quick tutorial to show just how easy using Charity Miles is.
I've been using Charity Miles
(off and on) for quite a few years now - at least back to 2012. The app has changed a bit since then, but the same basic idea behind it hasn't.
Every Mile Matters!
It's the perfect way for anyone to give back simply by going for a run, walk, or bike ride. There are a LOT of charities to choose from and the app really is so simple to use! You can earn up to 25¢ for a run or walk and up to 10¢ for a bike ride. All you do is use the app and then Charity Miles makes the actual donation to the various charities.
Seriously simply, but read on for a Step-by-Step guide to walk you through it all.
Step One
Download the app.
You can find it in the App or Play store, or click on the image below to go to their home page with links to download.
Step Two
Open the app and choose a charity.
If app doesn't open on a similar screen to the one on the left below, tap the 3 lines in the upper left of the app and tap Get Moving.
 |
| Scroll through the list of available charities and tap to choose the one you want to raise money for. |
|
 |
| Choose if you're running/walking Outdoors or Indoors, or if you're doing an outdoor bike ride. |
|
Step Three
Go for a run, walk, or bike ride.
 |
| Basic screen. Tap the little arrow in the lower right to expand. |
|
 |
Top half of expanded screen.
|
|
 |
| Bottom half of expanded screen. Plus, option to add a photo. |
|
 |
Take a photo in the app, or choose from your Library.
|
|
Step Four
Finish.
Tap the white circle with the red square to finish your workout.
 |
| Confirm if you're finished or if you want to continue. |
That's really all there is to it! Easy-peasy, right?!
Of course, there are a few more things you can do to make it even more fun!
Step Five
Share on Facebook, Twitter, or Both.
 |
Tap the green Share button.
|
|
 |
| Tap the Twitter icon. Leave the pre-populated message or write your own. If you added a photo in the app during your workout, it will automatically show up here. Tap Publish in upper right. |
|
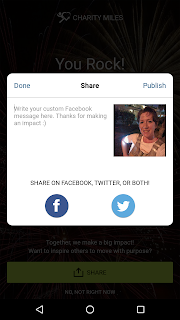 |
If you share to your personal Facebook page, you need to write your own message.
|
|
Step Six
Set a reminder.
 |
| I always just tap "Not yet" but I should set reminders to walk throughout the day! |
Step Seven
Join a team.
I'm not real clear on the benefit of joining a team. Anyone in the team can run for any charity they choose and there doesn't really seem to be any easy way to connect with your team, in or out of the app. There is the leaderboard, so maybe that is the appeal?
 |
| Select Teams from the menu that appears when you tap the 3 lines in the upper left. |
|
 |
| A few Featured Teams scroll by at the top. Or you can search for a specific team. It also shows all your teams listed. |
|
 |
| Tap into one of your teams to scroll through the history or peek at the Leaderboard. |
|
I think that about covers it. At least that's all the aspects of the app that I have either used or considered using. :-)
There are a few bells and whistles, but mostly it's a pretty basic, no-nonsense app that makes giving back super easy just by bringing your phone along for the fun!
If you haven't tried it out yet, I hope you do!
Do you use Charity Miles?
If you found this How-To Guide helpful, please consider sharing. 😍
Disclaimer: I am in no way affiliated with Charity Miles nor was I asked to write this post. I just enjoy the app and wanted to make it even easier for others to use it, too.


I haven't used Charity Miles, I will have to look into it, sounds like a great app to have
ReplyDeleteIt makes me feel just a tiny bit better on each run. :-)
DeleteWhat a cool idea this is! I'll have to check it out.
ReplyDeleteI hope you do! It's a fun, easy app that does some good, too.
DeleteI've never heard of this, but it's a great idea! Thanks for spreading the word.
ReplyDeleteYou're welcome! Thanks for stopping by. :)
Deleteyou know. I need to start using this again. I downloaded the app YEARS ago - probably about the same time you started....I used it for awhile and for one reason or another I stopped (probably got a new phone and stopped - short attention span. ha ha) I need to get back to it, because if I am going to put in the miles anyways, I might as well do it for a good cause too!
ReplyDeleteExactly! I haven't always been very good about using it. Sometimes, I'll go months without and then think, oh yeah! I have that app Charity Miles! lol. ;-)
DeleteGreat how-to. I think I didn't use this when it first came out because I had phone battery issues, but my newer phone should be able to handle this.
ReplyDeleteThanks, Coco! I think there have been a lot of updates to the app over the years, too, so that might help with the battery issue as well as the newer phone. :)
DeleteVery cool thanks for giving us the low down on this! :)
ReplyDeleteYou're so welcome! Thank you for asking for more info and giving me the idea of the tutorial. :)
DeleteI have not done it before because I don't use my phone during runs because I don't want the battery to die if I need it. How does this impact the battery? It sounds really cool.
ReplyDeleteI have not noticed any extra battery drain, and I often use it at the same time as another app (Nike+ or Strava).
DeleteI definitely need to start using this app, thanks for the guide!
ReplyDeleteYou're so welcome! Hope you download it and enjoy it.
ReplyDelete